I wanted to do something quite simple and to the point and found this awesome video from endless references on youtube that helped me with my animation:
They also had a slow motion reference of the same video and a grid overlay to help with posing.
I wanted to do something quite simple and to the point and found this awesome video from endless references on youtube that helped me with my animation:
They also had a slow motion reference of the same video and a grid overlay to help with posing.
This animator has really made me think twice about what I want to specialize in! His little quick animations are so well done.
His animations are short, sweet and to the point. I would much rather have a short animation and give time perfecting it than a long one with many more imperfections.
His website: http://animatorsteve.weebly.com/
His series of animated cycles, fight scenes, are impressive. It would be interesting to use any part of them for an interaction animation at some point.
The animation cycle with the dinosaur is particularly impressive in my opinion as he has let every character interact with each other and has planned a full repeated short cycle. They are all so fast and packed full of action.


Next year, we have to try animating quadrupeds. Vyas animated a bear and I like the subtle movements in each that he has added to make the animations flow better. The little shoulder movements with the armour give a greater impact in realness.

Apart from studying Animator’s Survival Kit, I wanted to look into real-life timing and other animations to give me some inspirations for my own run cycle.
A link to a pinterest board I created for some animation inspiration: https://www.pinterest.com/abigailgelston/animating/
Endless References was helpful yet again, but didn’t have many run cycles at all:
I found Stephen Vyas on pinterest also and he has some awesome animations other than runs which I will show after:
I really like how he shows the weight in this animation. The animation on a whole flows so nicely together.
Some other run cycles of his that I really enjoyed watching:


Vimeo link:https://vimeo.com/user1725384
I found this animator on vimeo and particularly like some of his walk cycles as they are quite natural. His woman walk cycle interested me as I’d like mine to be similar:
I love the hand movement in this male character as well:
I thought the lip syncing was really amazing. I haven’t tried this yet but will eventually. It looks really difficult to get the emotion right as well as the timing.
Blocked version:
Finished version:
He had imitated Ray Chase who has some amazing animation experience:
This book is mandatory!!! I ordered it and it has been so helpful for my walk and run cycles.
It really helped with timing and the poses are amazing, especially for animations to have a lot more character and feel to them.
Walk Cycles:
“We lean forward with our upper bodies and throw out a leg just in time to catch ourselves. Step, catch. Step, catch. Step, catch.”

Each person has a different walk.
Art Babbitt:
Women take short steps in a straight line- legs close together= little up and down on the body, as opposed to men who are the exact opposite.
What happens in a ‘normal’ walk:

Timing and framing is very important: I worked in 16s for the walks, like below, so each step was 3s long. Working in 16s is easier to divide up.

Foot action:

Weight Shift:

Arm action:

As I was mostly doing female walks, I looked into the female walk section.
Points to note:


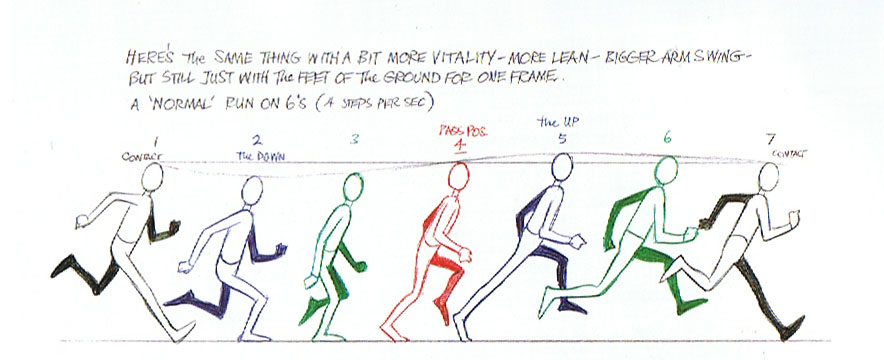
Run Cycles:
“In a walk ALWAYS one foot is on the ground. Only one foot leaves the ground at a time. In a run BOTH FEET ARE OFF THE GROUND at some point for 1,2 or 3 positions.”

I quite like the look of this angry run and the timing seems to be decent so I might try it out!

I thought these runs looked quite interesting as well:
Fat man running on 6’s

Or a young girl running on 8’s:

I spotted this walk cycle of Andrey Meshkotov (Ho4uK) and thought it was really natural.
I also love endless references on youtube and liked this as it had a really nice breakdown of poses. It’s in slow motion which helped:
This walk has a much longer stride that looks too unreal for me:
I spotted this on pinterest: https://www.pinterest.com/pin/397020523379738287/
but am unsure of who exactly animated it. The character from Lilo and Stitch has a lot more attitude with her walk which I love.
Natasha posted this video up on our animation and modelling page and I loved how smooth the motions were. The animation blends so smoothly from walking to sprinting.
I looked into some more of his work and this is awesome!
His animations have so much character and I love how many different actions he has animated:


While searching for online references to animate from, I came across a youtube channel called endless references. They have awesome pieces of action to work from and try out. I’m really unsure of what to choose but they are there just in case, and even to try out when I have some more time. They even provide a lot of the videos in slow motion to be able to block out the animation better.
https://www.youtube.com/channel/UCRvspTjApofA2Yg3i10gTdQ
Some personal favourites I would love to eventually try out:
I love that this shows balance and is something pretty action packed and not too advanced.
This was another favourite…although it would lead on from a good walk cycle which may be difficult!
This may be cool to try out as well.
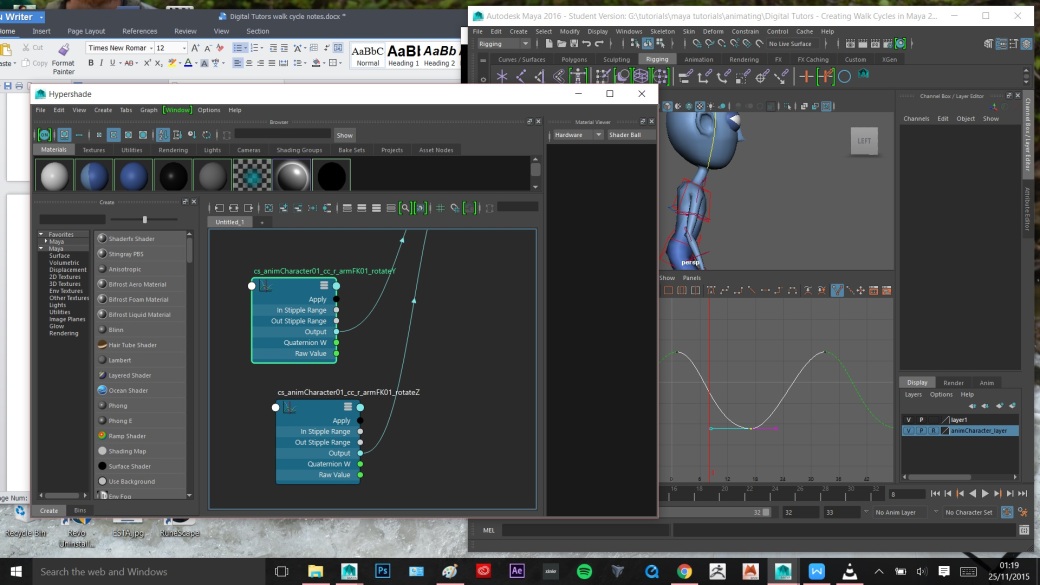
Overall, I learnt so many new things to do with animating in maya and the digital tutors really helped with my overall timing of walks and how to overlap action as well as follow through action. It also helped particularly with the graph editor!
Link to tutorial: http://www.digitaltutors.com/tutorial/354-Creating-Walk-Cycles-in-Maya
Notes created from the tutorials:
Digital Tutors walk cycle notes
I also added images of how i worked from the tutorial.
Setting up Scene
Animation preferences.
Casual walk cycle.
Beginning the Walk Cycle
Finishing the Contact Positions
Adding the Down Position
Completing the Extremes
Refining Upper Body and Feet
Balancing the Character in the Front View


Animating the Subtle Rotations of the Feet

Animating a Toe Flap for Fluidity

Adding Weight to the Hips

Animating the Rotations of the Upper Body
Working on the Chest
Animating the Head

Wrapping Up the Movement of the Upper Arms
Follow Through and Overlapping of the Elbows

Adding Follow Through to the Wrists and Finalizing
Refining Shoulder Movement
Finalizing the Walk Cycle
Translating a Walk Cycle Forward
Utilising Animation Layers to Add More Life
