We got really great feedback from both Alec and Mike for our final film hand in. I am extremely proud of how far we have come and have thoroughly loved working with Rachel. I think we have both constantly tried to push each other to further our abilities the entire year.
However, we still have numerous fixes with lighting and animation to complete before the end of year show. We got speaking to Mike again after the hand in and he went through the film with us:
Rachel took down his notes as we watched:
We knew for definite that plenty of shots have to be re-rendered (like shot 07 of the pocket watch close up as it rendered with a white background so the changes in after effects led the shot to be super bright) so we don’t mind fixing up a few animations. Mike also suggested making some cuts and completely cutting shot 11 as it was a strange cut from the previous shot and isn’t necessary as part of our story. This also may leave us some time to add in Rachel’s beautiful uphill sequence 05. I knew my animation had to be fixed for shot 05 and looking back it is ridiculously sticky and terrible, so I’m glad now that we can cut it until he hears Walter knocking and we can end with him walking over and leaning towards the wall.
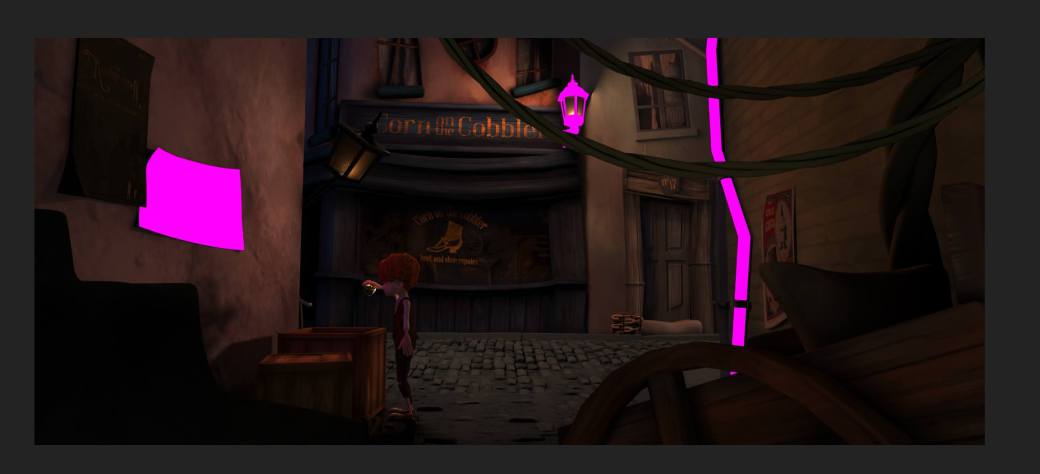
One of my main jobs this semester has been rendering. This has been extremely time consuming, however google zync has helped speed up this process. We encountered a lot of issues with zync, such as pink objects within scenes rendered out and objects that simply weren’t supposed to be rendered but worked perfectly within maya.
Pink objects meant that a texture was missing. This issue was diverted when I went into the file path editor to make sure texture nodes weren’t missing, or some were used. If the issue still occurred, I reset the background layer for the characters and reapplied the aishadowmatte material to override the collection.
This tutorial was extremely useful to setup google zync:
To help solve some problems, I tended to upload every scene before reuploading each layer to render.
Limit was set to 50 machines, so depending on the frames rendering, I set the chunk size to fit.
I avoided preemptible machines so there was no risk of losing work.
I also Ignored missing plugin errors so nothing was canceled.
Rendering out separate layers allows the control for color correction.
AOVS (render passes) allow further control.
When setting up render layers, these can be dragged over to create overrides for an entire collection within a layer.
Sticking to the plan:
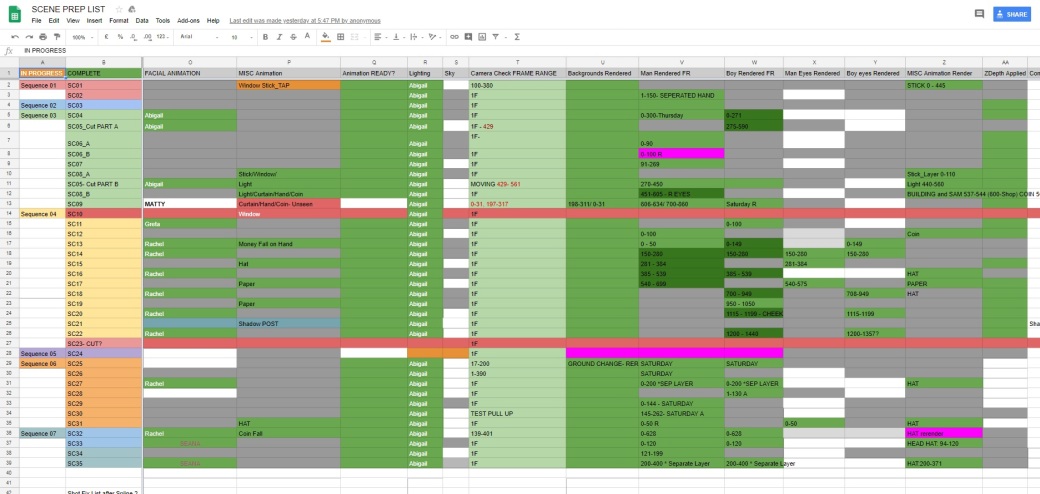
Certain Sequence setups were more difficult, but the scene prep sheet Rachel had initially drawn up was extremely helpful when keeping track of rendering.
Background setups were mainly setup on the masterlayer with z depth set up as a render pass so it could be used within nuke for certain shots. These were rendered out on the macs on uni as most were single frame renders and estimated at 25mins. The moving cameras were set to render on spare macs .
Character setups were a lot more complicated. Each layer consisted of two collections:
the character collection contained the character, objects they interacted with and the lights that affect them.
the background collection contained any shops/ground/objects that the characters shadow would cover. I then applied an override for the aishadowmatte to render out an alpha channel with the character and the shadowmatte in one beauty layer.
As Rachel was also setting up renders, she realised that we could have an absolute override on the background collection with the cast shadows turned off. When we didn’t have this, the shadow layers rendered out with our character made the backgrounds darker. This meant a lot of extra editing was necessary to remove the extra shadows.
As Rachel exported her animations for me to bring into the background scenes to setup rendering, she created ubercams which meant it was a lot easier to follow as every layer could render out of the same camera. This was really helpful when leaving the eye layers to render out separate overnight, as they were initially very dark.
Sample of character render layers:
When the characters were interacting, I placed both in a layer together to help any issues when it came to rendering out shadows. We also had issues with Samuel’s hat as it had to be pulled down lower by Walter in some shots, so we hadn’t sent the lowest possible way to Andrew so the hair could be hidden underneath. To solve this issue, I’ve been rendering out the hat separately for Rachel to comp on top just for the frames where the hair pokes out.
One big issue we had before the final presentation, without realisation, was the receive shadows as it wasn’t automatically set in the face layer. The image on the left (below) is without it on, and the second is it with. It makes a huge difference with lighter shadows and the shadows were less blue in color, from the skydome hdr.
Alec suggested rendering the eyes of the characters separately for certain shots as Walter’s turned out very dark in some. I had to put his face on the background layer and set the material to aishadowmatte so that the eyes could capture the shadow information:
SQ01 was one of the last backgrounds to be rendered and we experienced an on and off glitch in the window panes. Rachel realised that this was because the curtain plane was too close to the reflective window so this was moved. It wasted a lot of time rendering, sadly, however was remedied before the final hand in.
One major issue we had towards the end with rendering was, what I think, the computer lagging and some scaling issues. Some of Greta’s shots had eyes rendering out of place and teeth scaling issues (as seen below). I scaled the teeth back to one and had to figure out little problems here and there such as zeroing out the rotating eyes. I believe this was due to the geometry layer not being set to reference and instead it must have been moved without knowing. Some computer lag did occur so turning the mac’s off proved to work when some geometry was rendered as gone but looked fine within the viewport (as seen below).
The people that were going to Dingle within the class were encouraged to have business cards ready, however, I didn’t draw one up in time to be printed. I did manage to gather quite a few while I was down there, and the one that stood out the most to me was Daniel Katcher’s. The 3D dragon shown made the card so much more interesting and memorable and shows exactly what he does with just a glimpse, so I figured it would be good for me to show off the medium I want to work in, a.k.a sculpting characters.
I also thought it would be interesting to show on my card how I can go from the concept phase to the 3D look:
A lot of work is still to be done if I am going to follow up with this design, particularly lighting the 3D model. I may also test out the character Samuel for this. I also may write Modeler instead of concept artist.
I also had the idea of using the sketch I did for our current project for the environment design, however I mostly want to be modeling, so I don’t want to draw away attention from that.
Over Christmas, I did further research into Assassin’s Creed Syndicate (2015) for props for our short film. I opened up my game and explored the world a little. I sent these images I took to Rachel and Greta for them to model some crates and as ideas towards the typography within our short, shops and houses. I particularly love the crates of wine and love the posters that fill up the game.
I was at my grandparents over Christmas and found some great little assets that we could use within our short, like the oil lamp for the bedroom if we kept that scene, the pocket watch and some coins.
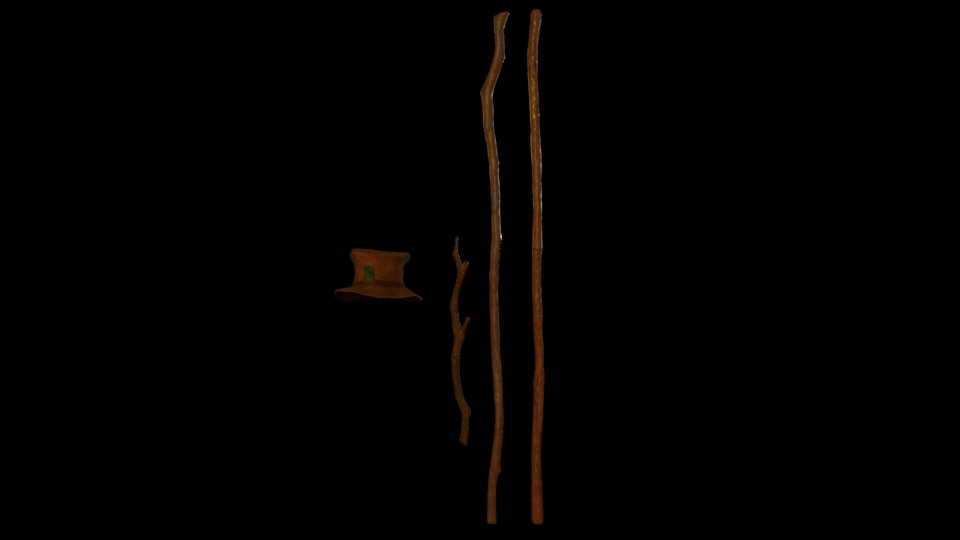
For the stick models I used the trim dynamic brush within zbrush to give it a hardened sculpted look like the sticks in the image above. I then used the damstandard to sculpt in the finer detail like the image on the right and made them slightly stylized.
I compiled Samuel’s hat, stick, Walter’s main stick and the first knocker upper stick onto the same UV tile so only a color map, normal and roughness was created and applied to each to save space.
Some alphas used to texture some clothing and Samuel’s hat:
Minolta DSC
OLYMPUS DIGITAL CAMERA
Posters
Many of this year’s short films have found ways of incorporating little fragments of other people’s projects. Beaky Blinders have added the Brightside teapot into their short film as well as our hat amongst other surprises. Brightside had a shelf of video tapes dedicated to projects and older projects from our year’s work. Amy Seaman added a keychain with pieces of some of our projects such as our knocker upper hat, Matthew Skelly’s acorn, a teapot etc. Natalie painted project versions of famous horror paintings.
After seeing the really simple posters in Assassin’s Creed Syndicate (2015), I thought it would be a really lovely addition to fill up empty spaces and create nice framing in some of our scenes with some posters, and adding a little something from some of the other short films and games.
Greta made the base of this standing sign, but I created newspaper clippings to add to our scenes and based stories around characters from other projects:
While going through Greta’s miscellaneous assets and buildings I changed tones of buildings, quick paintovers, darkened windows and retextured some assets. I retextured the glass milk bottle (looks best fully rendered), added milk, created the gold on the signs for the three biddies sweet shop and h.h. holmes butchers to add to the previous newspaper clippings. In the butchers shop, I darkened the window and retextured the other assets. Of her files, I also went through each and every file and reconnected textures/ froze transforms/ deleted histories so that each asset was ready to import
I tried out a couple of different shades for the cobblestones, but once tried out, we preferred the blue tint as the orange lights worked well against these.
I also made some concrete slabs for the sidewalk to match. I made them reversible and the squares even on all sides so that they could be rotated also so we technically had 6 different objects (excluding rotation):
I brought his body sculpt into Maya 2018, put it on live, and used the quad draw to build pieces of the clothing, then brought these parts into zbrush to detail them. Then brought them back, retopologised them and have started remapping to bring the detail back in.
I was struggling a lot with this, as it’s harder to figure out what detail is too much or too little to make an old character look old, but not too realistic as Samuel is quite simple looking with completely smooth skin.
Starting to sculpt:
I still have a lot of work to do on this character, but I wanted a base to get enough feedback for his features.
As I helped work on the story to begin with, I was also focused on the design of the project, so I drew over most of the frames of our first animatic up to sequence 7, shot 50:
To take a little bit of a break, I decided to model the characters’ eyes. I looked at these tutorials:
Sculpt:
Mapping:
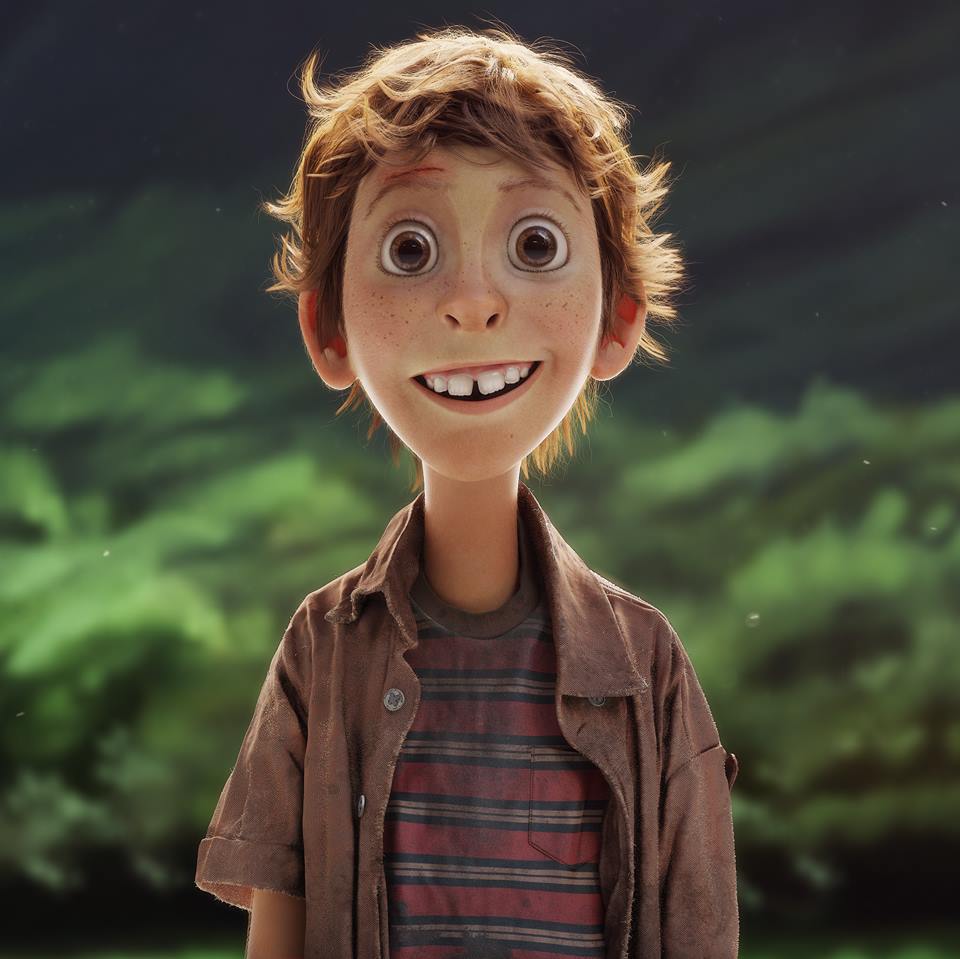
Samuel’s eyes: These are a little bit too much in my opinion so I may end up removing some of the small brown specs as they are very defining. I think the hazel and green will really complement the freckles and red hair.
Both eyes: We thought Walter would suit pale blue almost grey eyes. These are quite common in older people. I just can’t seem to grasp that big specular highlight even though I have the outer eye layer as very see through and completely reflective.
One of the focuses whilst modelling and texturing our characters will be the hair because we do want to make it more realistic as we have seen so many more cartoon-like characters such as Omar Taher’s sculpt based off of a concept by Jeff Delgado (link):
Alec also sent my team and I a link to a gorgeous tutorial that I followed by Michael Cauchi (link). I figured that this would be a lot easier since it followed my own flow from zbrush to maya.
Workflow that helped take away any issues I had with Cauchi’s when trying to create curves out of the zbrush curve tubes:
Convert geo to nurbs surface (Modify- convert polygon to subdiv, modify- convert subdiv to nurbs)
Nurbs surface>curves- issues here.
Make sure arnold render curve hair shader is ticked to render.
I could not figure out how to get red hair even with the research on solid angle, however, Alec figured out that my lighting was the issue, so I continued working with the skydome lighting. I know we initially wanted a more orange hair, but the Auburn was so lovely.
Experimenting from more clay-like feel to more realistic and from straight to more curly:
Color and Feel progress: I think these are closer to what we want, but I have to keep in mind that the hair will be shaped more like the sculpt and there will be many more tubes to turn into curves that will add to the stray hairs and will have a more realistic feel: